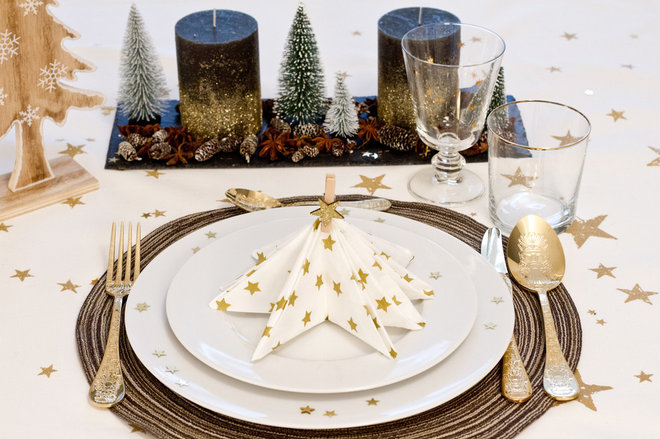
3 Fun Ways to Fold Napkins Into Christmas Trees
Get a 30-second preview of the steps in this stop-motion video and then follow the instructions below for the details. Try not to be discouraged if your first attempts don’t go as quickly as you’d like. Once you get the hang of it, you’ll be able to fold the napkins in no time — at least, that’s what happened to me.
For the perfect holiday table setting, have a clear idea of the colors you want to use — pick no more than three — and choose napkins and other decorations accordingly. It’s also important to have a shiny “spotlight” that draws light onto your setting. Think about adding a gold, silver, metallic black or crystal element to the decor.
Level of difficulty: Very easy
Requirements per place setting: One double-sided napkin, preferably at least 15 by 15 inches (about 40 by 40 centimeters), folded into a square. This will make a tree that’s 12 inches (30 centimeters) tall. Trees made from 12-inch napkins look a bit too small on a plate.
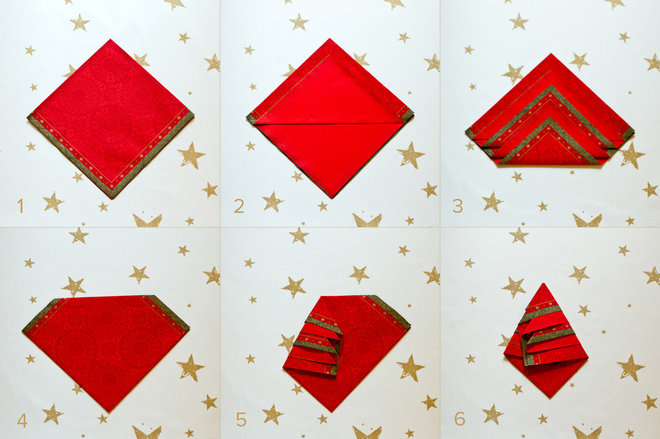
1. Place the napkin on a flat surface with the open corner facing you.
2. Fold the first layer of the napkin up to the top corner.
3. Repeat with the remaining layers, leaving about a half-inch (1.5 centimeters) between each fold.
4. Flip the napkin over and place it so that the point is facing you.
5. Find the center of the top horizontal edge. Fold the left corner in from that center point.
6. Repeat with the right corner. The new outer edges should be equal lengths and at the same angle to the center line.
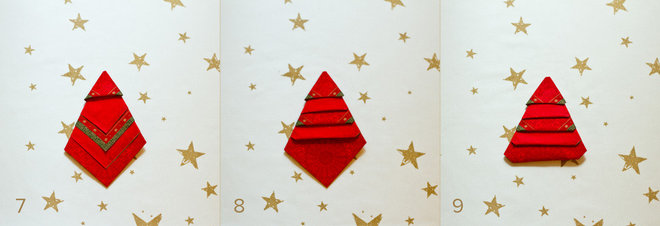
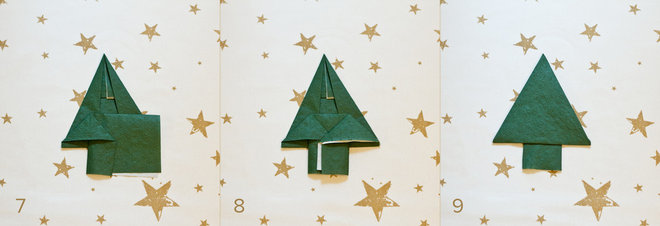
8. Repeat with the next three flaps.
9. Fold the bottom point to the other side to form the base of the tree.
Tip: Flatten the last layer, which forms the tree base, so that it stays in place, but keep the other layers looser to give your Christmas tree some volume.
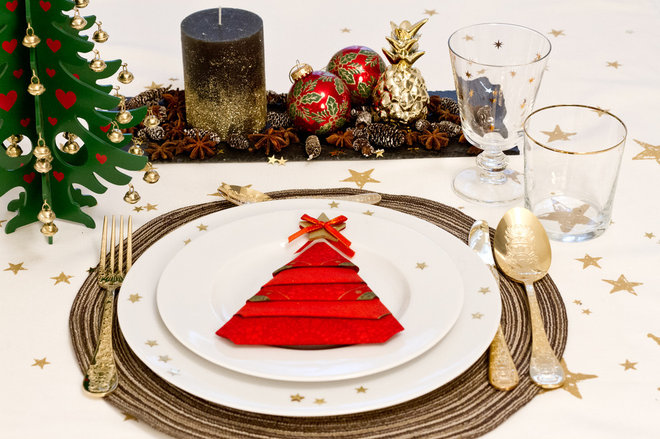
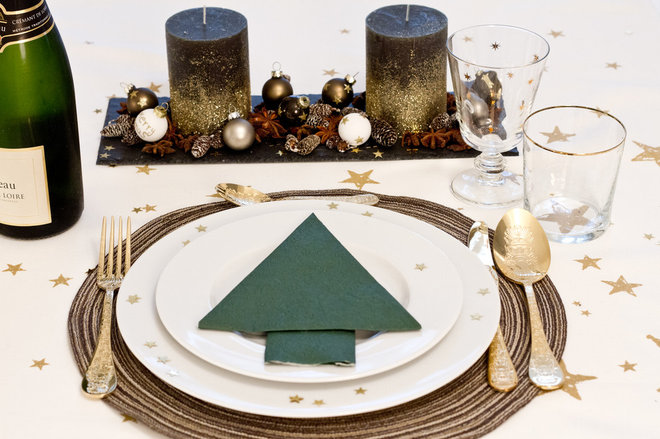
For this Christmas tree, I created a table setting in red, green and gold, adding a gold pineapple for a trendy touch. For the centerpiece base, I chose an inexpensive 15-by-5-inch slate tray, like those used for cheese tastings.
Browse napkins by color in the Houzz Shop
Level of difficulty: Easy
Requirements per place setting: One napkin, folded into a square
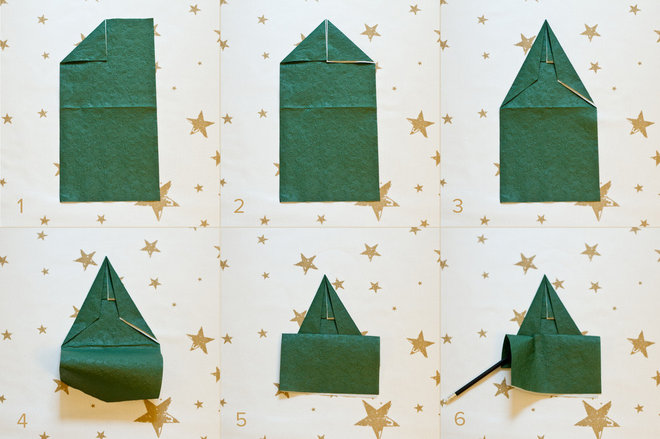
1. Open the napkin halfway and fold the upper left corner in to the center.
2. Repeat with the upper right corner.
3. Fold the same edges in toward the middle a second time. They should not cross the center line created by step 2.
4 & 5. Lift the bottom part of the napkin and fold it up, and then fold it back over itself and down. The two parts of this section should be different sizes, with the top part a little longer (as you can see in the picture for step 6).
6. Push your left index finger (represented by the pencil in the photo) under the flap and open the left side of the base.
8. Repeat steps 6 and 7 on the right side. Press the whole tree down on the work surface and smooth the outer edges with your finger.
9. Flip the napkin over and — voilà! — you have a perfect Christmas tree.
Tip: Vary the dimensions of the two folded triangles to create tree trunks of different lengths and widths.
You can embellish the tree with gold stars, berries and candied fruit, but avoid using sequins or other small decorations that could be swallowed accidentally.
Level of difficulty: Medium
Requirements per place setting: Two napkins, folded into squares
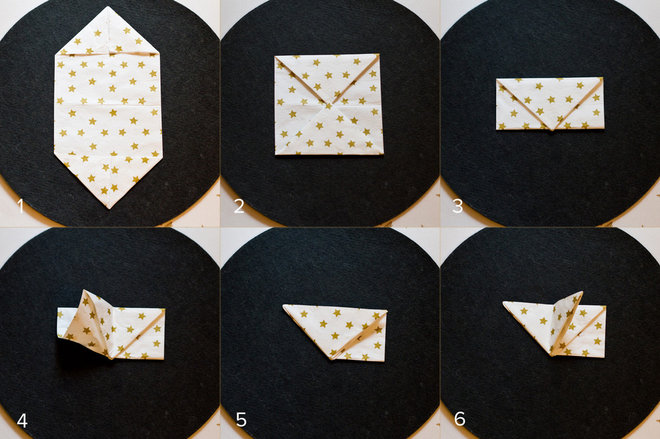
1. Open the first napkin halfway and fold the four corners in to the center.
2. Fold the upper and lower points so that they meet at the center of the napkin.
3. Fold the napkin in half so that you have a rectangle resembling an envelope.
4. Open the left side.
5. Fold the upper left corner to the right so that the flap forms a triangle.
6. Take the right corner of this triangle and fold it back to the left.
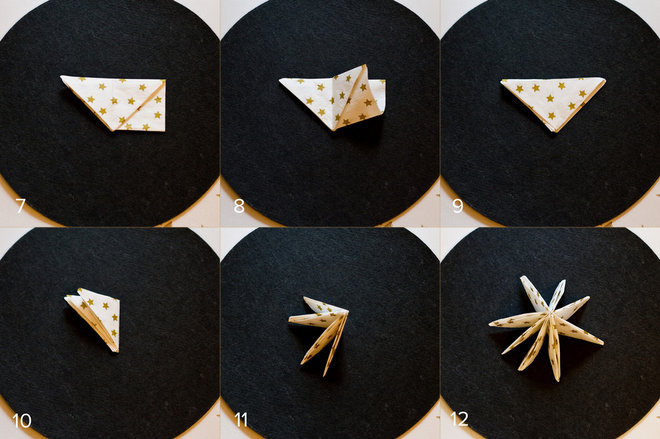
8 & 9. Repeat steps 5 and 6 with the upper right corner to get a multilayered triangle.
10. Fold this triangle in half again and press it all together.
11. Stand the napkin up as shown. This is the first half of your star Christmas tree. Repeat steps 1 through 11 to make the other half.
12. Combine the two halves of the tree and arrange the tips so that they are equal distances from one another. You can hold the two napkins together with transparent tape or a small clip, but don’t use staples or anything that could scratch someone or be swallowed accidentally.
Tip: Fold the napkins precisely to avoid having a sloppy-looking tree that wobbles on the plate.
The star-shaped tree can be clipped together with a Christmas-themed wooden clothespin that can serve as a place card and a small souvenir for your guests.
The star is great for New Year’s and other holiday celebrations as well.
